Book Review: Findus, Food & Fun
In my latest blog, I am reviewing a new book from Hawthorn Press called “Findus, Food and Fun”. Read on to see what I think of it along with a crafty idea taken from the book…
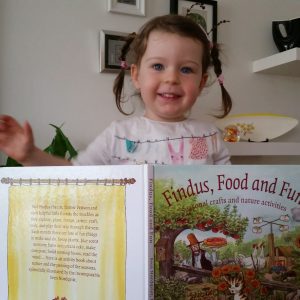
Do you remember that I reviewed “Findus Plants Meatballs” back in May of this year? It got a lovely 4 star review from me. Well, the clever people at Hawthorn Press (hi Meredith!) have sent me their latest book in the Findus series, which is called “Findus, Food & Fun”, to review – can it go even better?
Each month features several projects, many of them seasonal and loads of them are outdoor projects and things to do in the garden so immediately I am interested! Even some of the indoor projects can be given a gardening twist as you will see below (although many are already garden and nature related). From nature activities to foraging, baking to crafting this book is perfect for kids like me. Here are some of my favourite things about this book:
- There are wonderful illustrations throughout the book making it bright and colourful.
- It features Findus the cat who I already love and who features in LOADS of books
- There are loads of projects to try each month
- It is packed full of fascinating facts on all sorts of subjects
- A lot of the projects just use up things you have lying around the house from old socks to beans, lollipop sticks to old bottles.
I have already tried out one of the projects which I have featured below but there are loads more I will be trying out including:
- Chocolate leaf garnish (pretty and yummy!)
- Rowanberry necklace
- Suet bell for birdies
- Magic tulips
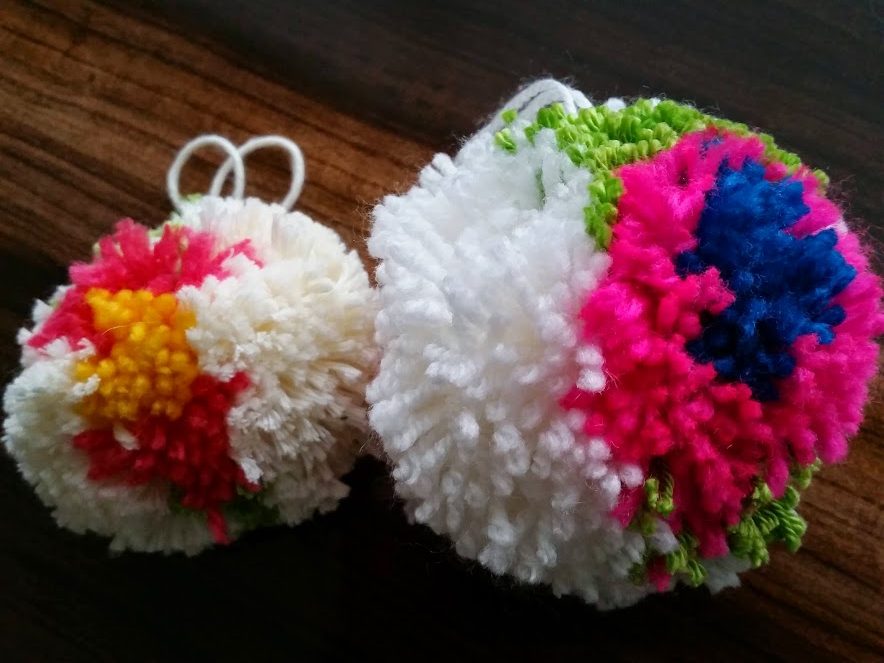
I was so excited to get this book that I decided to make a project straight away. After a good read, I chose to make the “yarn pompoms” from page 56. I just gave them a Lulu-style twist to make them even more relevant to me and my blog…
Flower Pom Poms
You will need:
- A pom pom maker or some cardboard
- Wool (4 colours)
- Scissors
To make:
1. I used a special pom pom maker to make my poms poms. They are inexpensive and make life easier but if you don’t have one, you can make your own. Just cut two identical circles from cardboard with a hole on the inside.
2. Choose your first colour which will be the inside of your flower. I like a nice bright colour for this bit. My pom pom making kit works in two halves. If you are using a cardboard circle imagine a line down the middle and you will be doing the same on each half. Take your first colour and wrap it around the centre of each half several times.
3. Take your second colour (another nice bright colour) and do the same over the top and a little to the sides of the first colour.
4. Next is your leaf so choose a nice green and do some green to each side of your coloured flowers i.e. 4 bits of green.
5. Finally, take your base colour (I used cream) and cover the whole thing until it is all covered and there is no space for any more yarn.
6. Now ask an adult to help. If you are using a pom pom maker join the two halves together. Cut around the edge of your pom pom between each piece of cardboard or the two pieces of pom pom maker.
7. BEFORE you remove your cardboard or pom pom maker, make sure you take a piece of yarn and tie between the two halves really tightly and create a loop to hang your pom pom from.
8. Give your pom pom a little tidy with the scissors.
And there you have it, a beautiful flower pom pom. They are nice to hang up around the house, add as an accessory to a bag or a present or as a Christmas decoration. You could also make lots of them to make a fun Christmas wreath for indoors or sew them onto some fabric to make a wonderfully soft rug.
I highly recommend Findus, Food & Fun. Maybe you could ask Santa for it for Christmas?
Happy reading and making everyone.
Lulu xx
Perfect Potatoes with Twigz
Our lovely friends at Twigz have supplied us with some awesome gardening equipment which I have used ALL year. One of my favourite things to grow is potatoes. Here I tell you a little about what I have grown, how my Twigz tools have helped and also a crafty project if you have a left over potato…
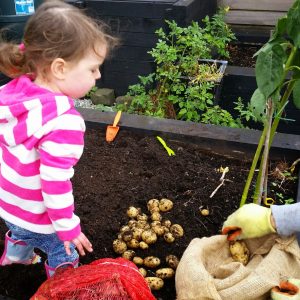
Me getting stuck into the tattie harvesting with some help from Twigz
Way back in March, I told you about 10 Easy Peasy Veg to Grow this year. Did you manage to grow any? One of the things I grew was potatoes, Maris Peer potatoes to be precise. They are really easy peasy to grow. You need to:
- Collect your seed potatoes in your handy Twigz bucket
- Clear/weed the area you want to plant the potatoes in using your Twigz hand tools
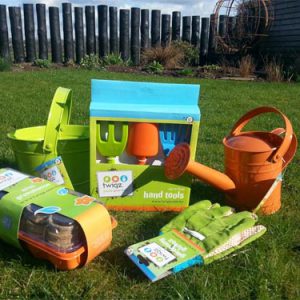
Twigz do a wonderful range of garden tools for children
- Dig holes using your Twigz trowel to plant your seed potatoes in.
- As the potatoes grow and you see the green leaves sprouting, cover them up (it’s called “earthing up”) until they get so high you can’t cover them any more.
- Keep your potatoes well watered while they are growing using your Twigz watering can.
- Keep the area around the potatoes well weeded
- Once the foliage has died back you can dig the potatoes up (time to get that trowel and bucket at the ready again!)
- Eat (yummy. Twigz need to make a knife and fork set for this part!)
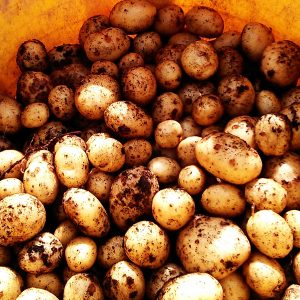
Our trug full of lovely perfect potatoes
So there you have it, easy peasy potatoes in one year. They store really well through winter too, just keep them in a hessian bag in a cool, dark spot. (The hessian bag is perfect for the sack race come Spring time too!)
Potato Stamping

Potato stamping fun
- A potato
- Paint
- Sharp knife (and a grown up to help)
- Paper
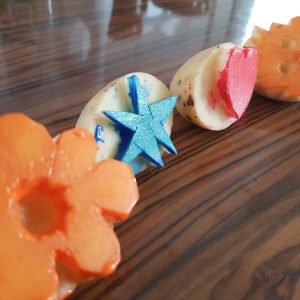
We cut some cool shapes
Awesome Blossom
I just LOVE this time of year. There is pretty blossom sprouting everywhere! In our front garden we have pretty blossom on a tree called Amelanchier ‘Ballerina’ (it was named after me I think!) and our lovely old cherry tree. It’s a cheery sight to welcome you home. But do you know why trees have blossom? And why does it only last a few weeks? Well, read on to find out why and also, how to make a lovely Spring blossom card.

Look, I have plum tree blossom
coming out of the top of my head!
What is blossom?
Blossom is simply flowers on fruit trees. But did you know that EVERY single tree in the world has flowers? Just that some have flowers so teeny or so hidden away that it’s impossible to see!
Why do trees blossom?
Fruit trees need to attract pollinators (e.g. bees) to help it set fruit. The bees flit from flower to flower, transferring pollen between flowers to ensure pollination.
Why does blossom not last long?
It only takes the pollinators a short amount of time to pollinate the trees so then the blossom falls off. It’s a pity as it’s soooo pretty.
Even though the blossom isn’t around for long, don’t worry as I have a lovely project up my sleeve where you can recreate blossom and make a lovely Spring Card.
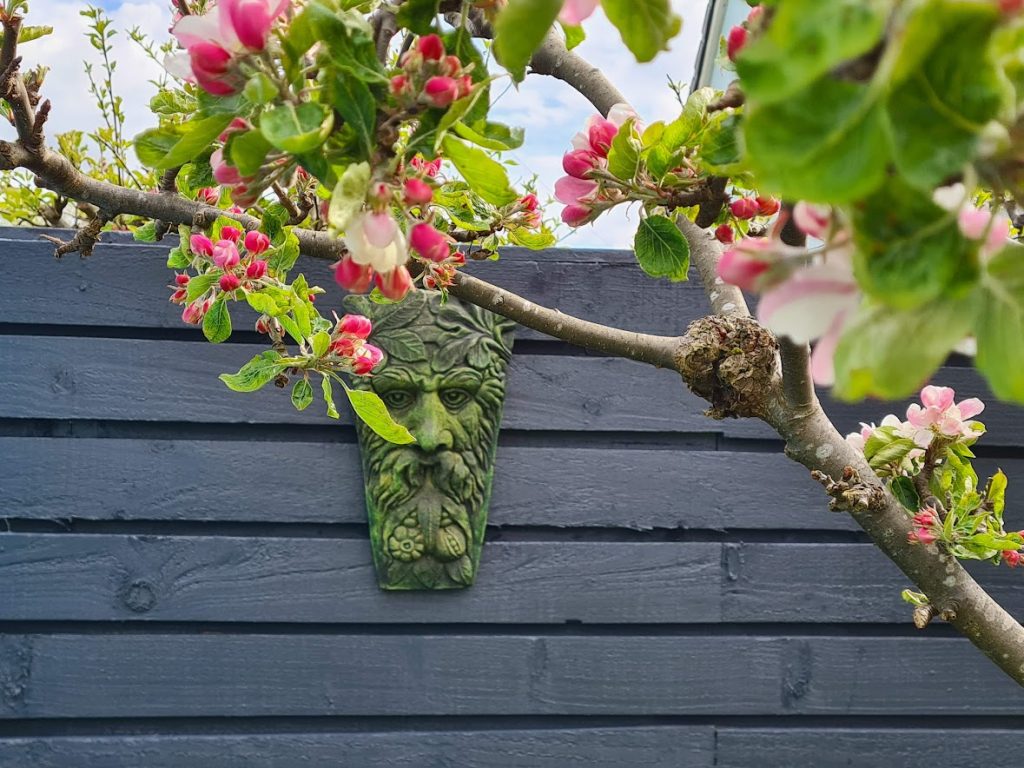
Blossom on our apple tree
Make Your Own Blossom Card
You will need:
- White card
- Paint
- Cotton wool
- Pen/crayon
To make:
1. Fold your piece of white card to make a card shape.
2. Use your pen or crayon to draw a tree trunk and branches on the card.
3. Dip your cotton wool into some pink paint and dab it around the top of your tree to make blossom.
4. Add grass (and flowers if you wish) to the bottom. Ta dah! A simple project which means you can have lovely blossom to look at for a lot longer.
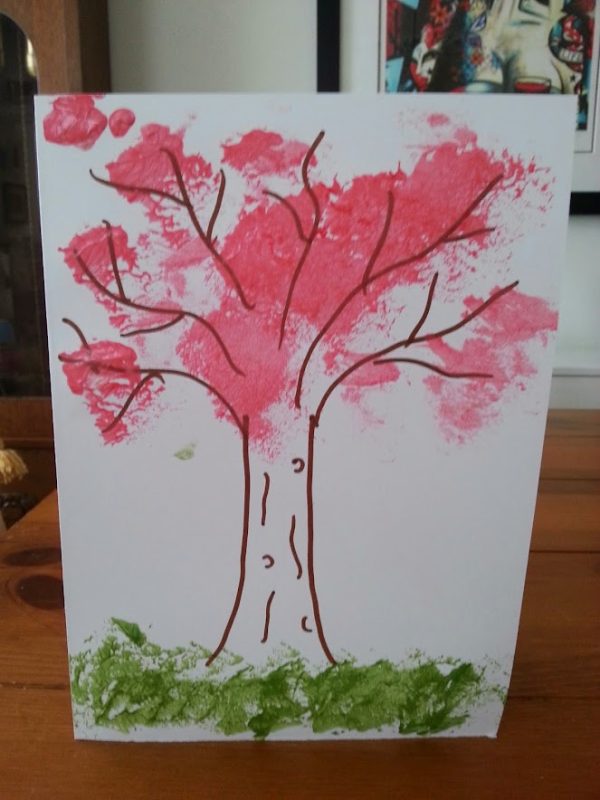
My blossom card
Lulu & The Sunflowers
As I might have mentioned last week, IT’S MY BIRTHDAY! I am now a big, grown up two year old. I don’t know where the last year went. Mind you, at least I can read back on my blogs to see what I have been up to 😉 Anyway, M&D threw me a wonderful party at the weekend and my lovely friends came along to celebrate. At the end I gave them all a party bag which contained something very special indeed…some sunflower seeds! So, I have officially launched the “Lulu & The Sunflowers Competition”. We all have to plant the sunflower seeds and send in photos of us standing beside our sunflowers. The person who grows the tallest sunflower wins a prize, huzzah!
Now, as I am taking part in this competition too (no show without punch!) I don’t want to give away too many tips to the opposition. But, I am taking my chances ‘cos I know that you, my lovely readers, all want to hear my top ten secrets for growing sunflowers…

Is there anything as cheery as sunflowers on a sunny day?
- You can plant your sunflower seed straight out where you plan to grow it. You need to wait until the last frost has passed though. Just dig over the soil and remove any weeds.
- If you don’t have anywhere in the garden to plant your seeds, don’t worry you can plant them in pots too, just make sure there is plenty space for the roots to grow.
- Sunflowers like lots of sun (isn’t that a coincidence Mummy?!) so choose your spot carefully.
- Dig a drill about 12mm deep
- Plant your seeds, leaving about 10cm between each one
- Cover your seeds with soil then water them gently. You will need to keep them well watered.
- As they grow, if they are too close together then thin out your sunflowers so they are 45cm apart, leaving the strongest seedlings.
- You may need to protect young seedlings from slugs and snails. If you cut the top off a plastic bottle you can use that to protect them.
- As your sunflower grows you will need to give it some support so add a cane and loosely tie the seedling to the cane.
- Sit back and watch your sunflower grow. And grow. And grow. And grow. And grow…
And remember, after your sunflowers have finished blooming, leave the flower heads so the birds can feast on the seeds.

I’m aiming high with my sunflowers!
I can’t wait to get started. I am soooooo going to win this competition! I’ll let you know later in the summer how everyone got on. Remember to send in pics of you with your sunflowers in the summer, I would love to see them.
Lulu