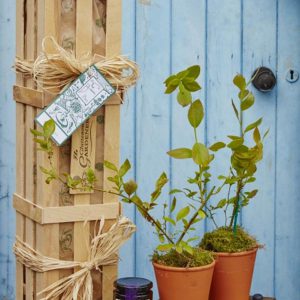
Archerfield Willow Walk & Fairy Garden
We were recently in East Lothian for a long weekend so popped into Archerfield Walled Garden on the recommendation of a friend. Whilst the walled garden was getting a lot of work done so there wasn’t a lot to see, we had a lovely walk round the Archerfield willow walk & fairy garden. Here are some of our highlights and why it’s worth a visit…

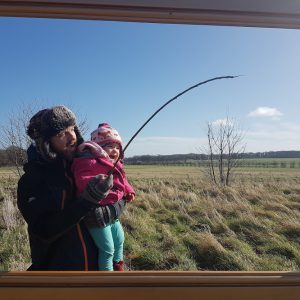
In the beautiful grounds outside Archerfield House, there are some wonderful views to enjoy. There are even picture frames highlighting some of the best views!
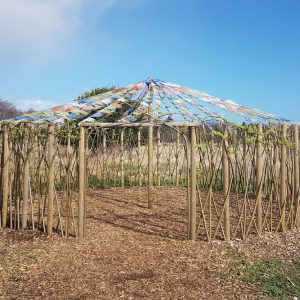
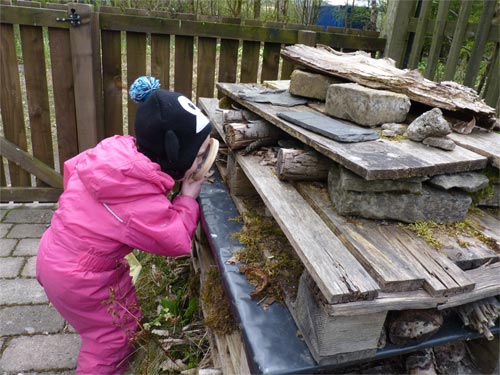
We followed the Willow Walk first and found some amazing structures on the way including this dome…

A willow yurt…
A willow viewing area with benches…

And a wishing tree where you could make a wish and leave a ribbon…

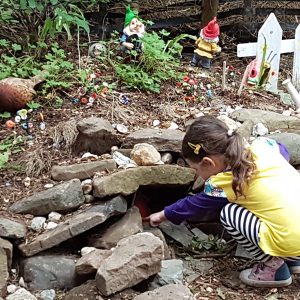
In the Fairy Garden we could go through the Big gate or the Little gate!

There were toadstools which were great for sitting and balancing!…

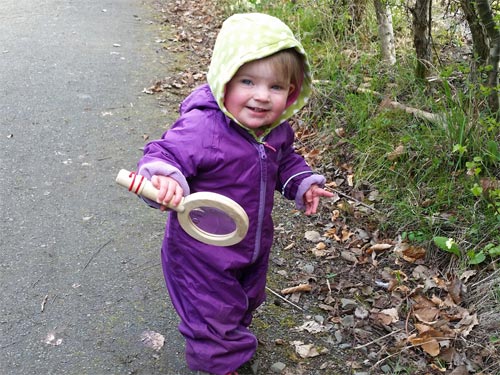
And there was quiz which took you all around the fairy garden, searching for doors…

…and finding the clues…

We were tired out once we had done that so we went to their lovely cafe to re-fuel. We then had a play outside in the adventure playground whilst Mummy had a look round their lovely shop.
Pop along, it’s well worth a visit.
Lulu & Tilda xx
5 Reasons To Grow Your Own Fruit & Veg
Sometimes people ask “Why bother to grow your own fruit and veg? It’s more hassle. Sometimes crops fail. Why not just pop along to the supermarket and get your ready picked, washed, convenient produce?” Well, there are lots of reasons but we’ve freshly picked our top five, just for you…

Cracking courgettes!
IT’S CHEAPER
In the current economic climate, more and more people are struggling to make ends meet. Growing your own fruit and veg is a lot cheaper than buying it fresh in the supermarket. Lots of us have our own garden or space for a few pots or there are lots of allotments available which are cheap to rent. Packets of seeds don’t cost much and if you keep your eyes peeled they are often being given away for free!
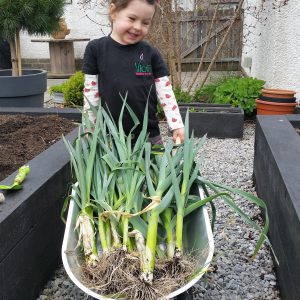
Lovely leeks!
IT’S HEALTHIER
Eating fruit and veg is a great way of keeping healthy. And when we grow it ourselves it’s even healthier as it couldn’t be any fresher. Plus we can grow it organically and know there hasn’t been any yucky pesticides sprayed all over it. Also, gardening is a great form of exercise so there’s another tick in the healthy box!
Super salad!
IT’S TASTIER
It’s genuinely true that what we grow ourselves tastes better. The tomatoes that we grow in our own garden couldn’t survive in a supermarket as they have such fine skins and are bursting with juiciness. Fruit and veg starts to deteriorate as soon as it’s picked so the quicker you can get it into your tummies the better. Raspberries don’t even make it to the house in our garden, they are in our tummies within two seconds of being picked!
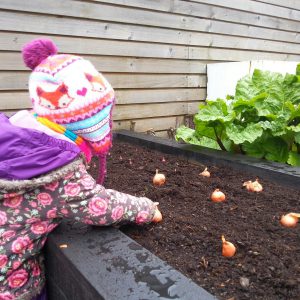
Awesome onions!
IT’S BETTER FOR THE PLANET
By not relying on supermarkets as much, we are reducing carbon emissions by requiring less trucks which have to transport fruit and veg many miles to get from the grower to the supermarket and then to our homes. There’s also no packaging required to get your potatoes or carrots from your veg patch to your house. And no chemicals required to grow them if you grow organically.
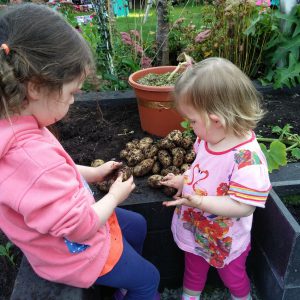
Perfect potatoes!
IT’S FUN!
We all know that being outdoors and getting dirty is a lot of fun! Doctor’s are even prescribing gardening as therapy these days. So get outdoors, dig over a section of your garden and see how much fun it is to see fruit and veg growing from teeny tiny seeds which eventually are big enough for us to eat. Amazing!

Mucky fun!
So why not choose at least one new vegetable or fruit to try growing this year and see what you think…
Lulu & Tilda xx
The Perfect Outdoor Party
You may have heard recently, it was pretty big news, I had my 5th birthday! Yes, I am FIVE! To celebrate, me and a few of my besties had a woodland party. If you are looking for something pretty cool to do for your next birthday then read on to find out more about the perfect outdoor party…
On the hunt…
Wild in the Woods
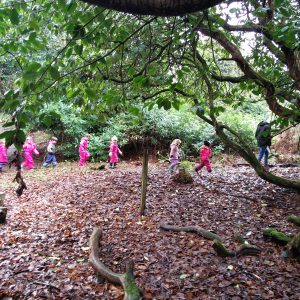
After a LOT of deliberating, I decided on a bush-craft party run by Green Aspirations near Balfron. They are a woodland-based social enterprise with a mission to inspire outdoor learning so we are completely on the same wavelength!

Hanging about being 5!
You can choose what sort of activities you want to do at your party and there are lots to pick from such as den building, bow and arrow making and bush-craft arts. We picked a treasure hunt for our main activity which was loads of fun! We had to find lots of cool “treasures” in the woodland and what a beautiful setting it was too with babbling rivers and carpets of snowdrops everywhere!
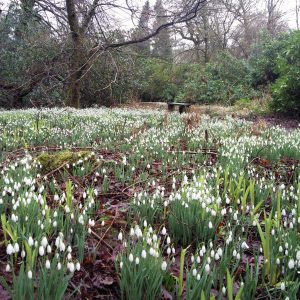
A beautiful carpet of snowdrops
We then had to hunt for a box of wood cookies which we then decorated and made into special birthday necklaces which my friends all got to keep and take home with them.
After some yummy snack we then toasted marshmallows on the bonfire which was LOTS of fun.

Finding treasure!
Thank You Gifts
And finally, to thank my friends for coming I gave each of them a cool “Grow Your Own Tiger Stripes” seedbom from Kabloom to help brighten up a gloomy corner somewhere.
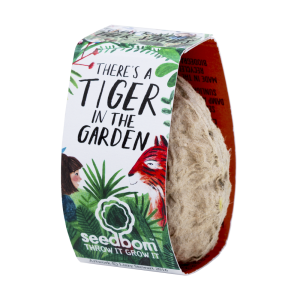
A seedbom from Kabloom
Pop along to the website of Green Aspirations to read more about cool party ideas and workshops for everyone to enjoy. There is also the lovely cafe, shop and holistic centre at Tir na nOg to visit while you are there.
Lulu x (aged 5!)
Make Your Own Fairy Door
All good gardens have fairies living in them. As expert gardeners, we know a thing or two about fairies too. So we thought that we would share some of our knowledge with you and show you a really easy and cheap way to make your own fairy door and make sure fairies come to live in your garden too…

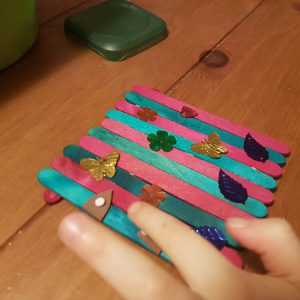
Lulu & Tilda’s fairy doors
Fairies, a bit like us, come in all different shapes, sizes, colours and like lots of different things. So whatever theme, colour, accessories you choose to put on your fairy door there is sure to be a fairy out there who will LOVE it and come to live in it. But did you know there is a very special way of knowing if there is a fairy living in your garden? Well read on and I will tell you how…
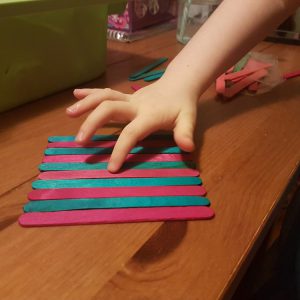
Lay out your sticks
To make our own fairy door we used:
- Lollipop sticks
- Glue
- Foam sheet
- Jewels to sparklify your door
To make:
1. Take your lollipop sticks and make a row which is the same length as one stick on its side.
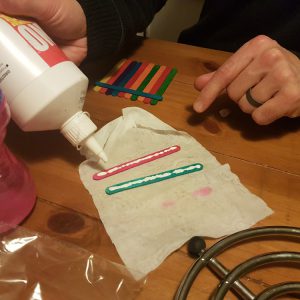
Add glue
2. Put glue on 3 more sticks and put one across the top, one across the bottom and one diagonally in between. Leave to dry.
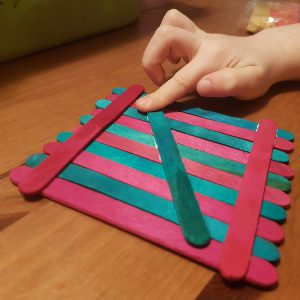
Lay the sticks across the rows to hold them together
3. Make hinges out of pieces of foam sheet and stick these to your gate. Do the same for a door knob. Then decorate your door in whatever style you think your fairy would like. It could be a woodland theme, sporty, glittery, rockets, whatever you like.
Decorate your fairy door
4. Find a special place to put your door.
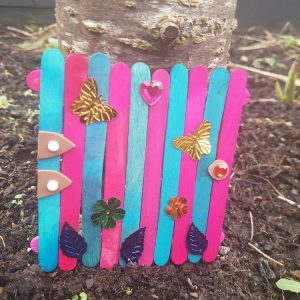
Find somewhere special for your fairy door
We put ours at the bottom of an apple tree, beside our tree house so we could be close by. Where will you put yours?
If you don’t have a garden to put your fairy door in then don’t worry as there are also indoor fairies who would love to come and share your home.
You can also make a whole fairy garden for them to enjoy with features like ponds, decking, clothes lines for their sparkly clothes and lots more. We show you how to do that in this blog we wrote earlier.
Now, we promised to share with you the secret of how you know if a fairy is living in your fairy garden didn’t we? Well, if you put a button beside the door, once a fairy moves in that button will disappear until they move out again. Clever huh?
Sparkles,
Rose River & Glimmer Thistle (AKA Lulu & Tilda)
Big Garden Birdwatch 2017
It’s the Big Garden Bird Watch this weekend, 28-30 January, so get your bird feeders filled, find a good window to sit at, a nice cup of cosy milk (or tea if you prefer) and get watching! I love hanging out with my feathered friends. Daddy and I went to Jupiter Urban Wildlife Centre recently for their Winter Birds workshop so we have some top tips to share with you on caring for your garden birds…

A robin hanging out on our garden globe
Make a bird house
I am very lucky and have a lovely cosy home to live in so I thought it was only fair to make a nice home for my feathered friends…
Get some left over pieces of wood or use an old pallet. Get a grown up to help cut the wood to the right lengths. There are some great tips in this post from the RSPB including different hole sizes for different birds. My favourite part was hammering all the nails in as it makes so much noise!
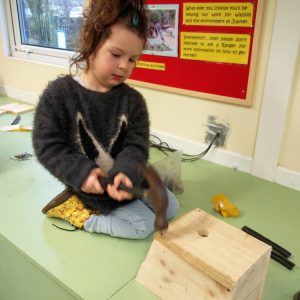
Hammering nails into the birdhouse was fun
Once you have completed your birdhouse choose carefully where you want to put it in your garden. You will find some tips on siting bird boxes here.
Make an apple/sunflower feeder
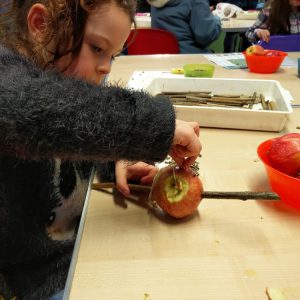
Push sunflower seeds into an apple for a tasty treat
- Push sunflower seeds into an apple for a tasty treat
- Core an apple, put a piece of string through the hole and tie a knot in it then push the core back in.
- Push sunflower seeds into the apple, all the way round.
- Finally, push sticks into each side of the apple to create a ledge for little birdies to sit on and feed.
Make a pine cone feeder
Push the lard into all the bits of the pine cone
- Push the lard into all the bits of the pine cone
- Tie a piece of string around the pine cone.
- Fill all the gaps in the pine cone with generous amounts of lard.
- One covered roll it in bird seed and hang up for the birds to enjoy.
If you want to take part in any of the workshops held by Jupiter Urban Wildlife Centre, visit their website.
Happy bird spotting everyone.
Lulu xx
Lulu’s Review of 2016
Now that Santa’s been and we are almost in 2017, it’s time to have a quick look back at what’s been happening in 2016. What was your favourite thing in 2016? Here are a few of my top picks, from best books and products to best places I visited…

Having fun outdoors was the most important part of 2016!
Garden of the Year
The winner of this accolade simply has to be Jupiter Artland this year. We had a wonderful day there this summer with the very talented photographer Julie Howden who took some lovely photos of me and Tilda. It’s such a fun place to hang out. Our favourite is the land-forms by Charles Jencks which we ran around for hours! It’s packed full of amazing sculptures and bits to explore.

Hide and seek is the best fun at Jupiter Artland
Event of the Year
The winner of this award is the Fairy Trail at the Woodland Experience in Balfron. It was such good fun we went there twice and I am already planning on going back again when they re-open next Spring. There are LOTS of fairy doors to find, a wishing chair, worry tree and LOTS more.

Fairy Trail Fun
Product of the Year
This was a hard choice and we have reviewed lots of amazing things this year. My pick is not cheap but it’s worth the money as it’s such great quality, very practical and we will use it for years. It’s the Twigz wheelbarrow! It’s so sturdy that it makes wheeling Tilda about super easy!

The Twigz wheelbarrow is great quality
Craft Project of the Year
We LOVE a craft project at Vialii Towers so we had plenty to consider for this award. My choice is this super cute glittery acorn.

Glittery acorns – gorgeous!
Top Tip of the Year
We are always looking for cheap and easy ways to have fun outdoors. We had lots of fun playing noughts and crosses with some twigs and pebbles on an old tree stump. Free fun is the best!

Free fun!
Book of the Year
Our final award, for the best book, goes to the The Children’s Garden. A brilliant book packed with loads of great ideas to do outdoors throughout the seasons.

My book of the year
So that’s my review of 2016. I hope you had as much fun as me. Here’s to getting outdoors and having a ball in 2017!
Happy New Year from me, Tilda and all at Vialii.
Lulu xx
Real or Fake Christmas Trees?
We’re getting ready to rock around the Christmas tree but if you haven’t already bought yours, are you wondering whether to go for a real or fake Christmas tree? Do you know just how environmentally friendly a real tree actually is and how it compares to a fake one? We have all the facts plus how to get rid of your real tree in an environmentally friendly way. Read on…

The Facts
An artificial tree is normally made from plastic which comes from oil which makes up for two thirds of its carbon footprint. A further quarter of its environmental impact comes from the industrial emissions when it is being manufactured.
A 2m artificial tree has a carbon footprint equivalent of 40kg of greenhouse gas emissions. This is TWICE the level of a real tree which is disposed of in landfill. However if you choose a more environmentally friendly way of disposing of your tree such as burning it then a fake tree has TEN times more emissions. In other words, if you have an artificial tree you would need to re-use if for at least ten years before it became as good an option as a real tree.
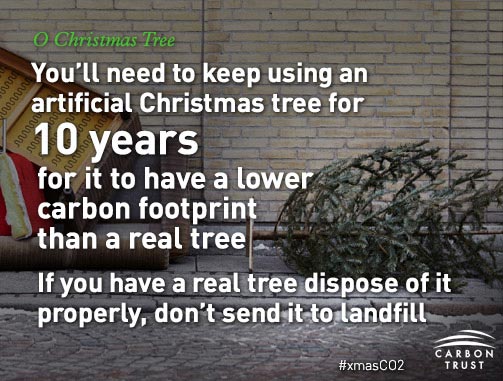
The way in which you dispose of your real tree is the most important factor. If you burn your tree on your bonfire, plant it or get it chipped it reduces its greenhouse emissions by up to 80%!
Benefits of an artificial tree:
- Cost. They are normally less than real trees and can/should be re-used for many years.
- Ease. Just bring it out the attic each year and decorate it. Some even have lights already built in.
- Suitable in surroundings where real trees are not possible (hospitals, places were flammability is a big issue etc.
- No needles all over the floor.
- No disposal issue
Benefits of a real tree:
- Environmental impact
- The joy of going tree hunting and picking the right one
- The look, texture and of course the smell!

Daddy and I with a real Christmas tree
For us at Vialii Towers, real always wins. And we have a wonderful option for disposal thanks to our local Scouts who collect them each year and then arrange for them to be chipped and the mulch used locally.
If you need tips on what variety of real Christmas tree suits you best then read my blog all about it.
Wishing you all a wonderful Christmas and many happy times around your Christmas tree, whatever kind you have.
Lulu & Tilda xx
Lulu & Tilda’s Kids Gardening Gift Ideas 2016
Dashing through the snow, in a one-horse open sleigh. Oh, hi there, just getting in the Christmas spirit! How’s your Christmas shopping going? Still need some cool ideas for the little ones in your life who like getting outdoors? Well, you’re in luck as we have done the hard work for you and brought to you our TWELVE favourite kids Christmas gifts they might want to ask Santa for this year…

1. Rainy Pot
As well as getting outdoors to do a bit of gardening we love having indoor plants too. Sometimes it can be hard to remember to water them though which is why this Rainy Pot is totes perfect! The cute little cloud holds water which it gradually releases onto your plant. £24

The Rainy Pot waters your plant for you
2. Gruffalo Tool Bag
If you’re a busy gardener like us you need a handy tool bag for all your tools. We love this one which features one of our favourite characters, the Gruffalo! It even comes with three tools to get you started. £14.99
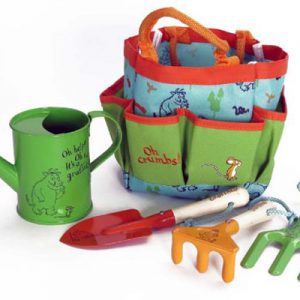
Oh help, oh no, it’s a Gruffalo tool bag!
3. Grow Your Own Spinach
He’s Popeye the Sailor Man.
He’s Popeye the Sailor Man.
He’s strong to the finish,
Cause he eats his spinach,
He’s Popeye the sailor man.
Now you can grow your own spinach and get huge muscles just like Popeye! £6.99

I is disgustipated.
4. Solar Fairy Jars
These pretty jars work on solar energy and are perfect for lighting up the garden on a wintry evening so the fairies can still see where they are going. £14.99
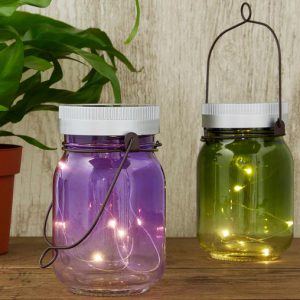
Pretty lights to hang around the garden
5. Garden Vouchers
If someone in your life has everything they need apart from time then treat them to one of our Vialii garden vouchers. It can be spent on anything from grass cuts to a pretty new planter and you can choose any value you like. Perfect. Just like us 🙂

Vialii garden services gift voucher
6. The Blueberry Box
We LOVE growing blueberries in our garden (almost as much as we love picking and eating them!) This lovely pair of blueberry bushes comes in terracotta pots and are perfect for your patio. £38
Grow your own blueberries, yum!
7. Grow Your Own Bug Eating Plant
If blueberries are too sweet for you, try growing something gruesome like these bug eating plants! Perfect for the little monster in your life! £8
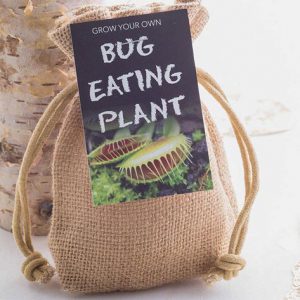
Watch out for this bug eating plant, snap!
8. Grow Funky Veg Kit
This cool kit has all that you need to grow some cool and unusual veg – from purple carrots to red brussel sprouts you will wow your friends with your quirky homegrown produce. £14.99

Grow some stripey tomatoes!
9. Zombie Gnome
Gnomes have got a bit of a reputation for being a bit twee but no-one is going to mess with this zombie gnome. Wonder what he gets up to when we’re not around, yikes! £9.99

The Walking Dead comes to Gnomeland!
10. Den Kit
This kit has all that you need to make your very own den. From tarpaulin to mallet you will be able to head off on adventures and create dens wherever you go. Perfect for your own little adventurer. £34.95
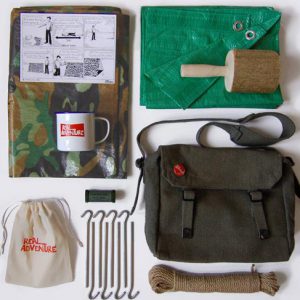
Everything you need to make your own den
11. Garden Flamingos
Our mummy loves flamingos so we are going to save up all our pennies to buy these kitsch garden flamingos for her (sshhhh, don’t tell her!) These are the original designer ones but there are other cheaper ones available as a single pair too. £59.95 for two pairs.
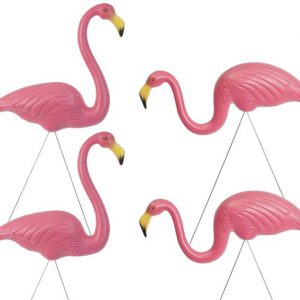
Garden flamingos, just like Gnomeo & Juliet
12. Magis Pipe Dream Watering Can
How cool is this watering can? It looks like an alien! They come in different funky colours. Perfect for keeping kids entertained for hours. £58

Is it a monster? An alien? Nope, just a cool watering can!
So, there you go, our eclectic mix of cool stuff for kids this Christmas. Happy shopping everyone.
Lulu & Tilda xx
Prices and links correct at time of publication.
Autumn Craft Ideas
Everywhere we go just now there are lovely autumn jewels to find which are perfect for making crafts. From conkers to acorns, pine cones to leaves, read on for some great autumn craft ideas of things to make when you are tired out from jumping on leaf piles!

Autumn crafts are heaps of fun
Autumn Fairy
I love fairies and fairy gardens so this one was top of my list to make! Take a pine cone and glue an acorn to the top of it to make a head. Add some leaves to make wings and a skirt as well as a little addition to her hat and that’s her complete. I used sage leaves for my wings but sycamore leaves would look awesome too.
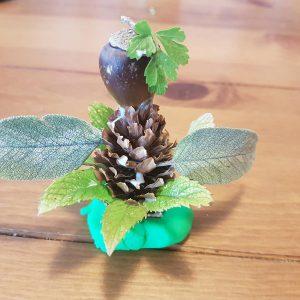
My beautiful autumn fairy
Conker Snail
This is the simplest of all my autumn crafts but it’s soooo cute and they are great fun to play with. It was Tilda’s favourite! Just take some modelling clay (we used play dough) and make a sausage shape. Add a conker for its shell and make the feelers/face at one end. The quickest craft for the slowest creature!

Cute conker snails
Owl Acorn
These are super cute and easy to do. Take an acorn without its hat. Glue on some eyes, a beak and some feathers and you’re done. It would be cute to make a row of these. You could even glue them onto a branch.

It’s an acorn. And it’s an owl. Cool!
Acorn Necklaces
We decorated a couple of different acorns which are easy to then attach some string to in order to make the coolest necklaces ever! One option is to paint the acorn, draw on a cute wee face and then glue its hat on at a jaunty angle! My favourite though is the glittery acorn necklace. Simply cover the acorn in glitter (I chose one colour for the main acorn and another for it’s hat). Leave it to dry, add some string and you have a gorgeous necklace.

Glittery acorns – awesome!
What ideas do you have for autumn crafts?
Happy crafting!
Lulu xx
How To Prune Roses…
Hey everyone. Did you know that whilst we call the sharp spikes on roses “thorns”, they are actually prickles! Well this blog isn’t just full of useless facts like that, it also has some top tips on how to prune roses as well as a review of some secateurs we have been trying out recently. I’m off to make some rose perfume whilst you have a wee read…

Having a smell of some roses at Alnwick Gardens
Rose Pruning Tips
The lovely people at the RHS know lots about garden (possibly even more than me) so here are their tips on how to prune a rose:
- Late winter (February or March) is often a good time for pruning roses but see the individual rose profiles above for more specific timing.
- Cuts should be no more than 5mm (¼ in) above a bud and should slope away from it, so that water does not collect on the bud. This applies to all cuts, whether removing dead wood, deadheading or annual pruning.
- Cut to an outward-facing bud to encourage an open-centred shape. With roses of spreading habit, prune some stems to inward-facing buds to encourage more upright growth

Water on roses, photographed by Julie Howden
- Cut to the appropriate height, if a dormant bud is not visible.
- Cuts must be clean, so keep your secateurs sharp. For larger stems, use loppers or a pruning saw.
- Prune dieback to healthy white pith
- Cut out dead and diseased stems and spindly and crossing stems

Roses photographed by Julie Howden
- Aim for well-spaced stems that allow free air flow.
- On established roses, cut out poorly flowering old wood and saw away old stubs that have failed to produce new shoots.
- With the exception of climbing roses and shrub roses, prune all newly planted roses hard to encourage vigorous shoots
- Trace suckers back to the roots from which they grow and pull them away
Product Review:
So, now that you are armed with the facts you need to make sure you have good secateurs. We have been trialling the Spear & Jackson Ratchet Anvil Secateurs. The manufacturers say they have a high carbon steel blade for strength and durability (which is PTFE coated for smoother cutting and rust resistance), cast aluminium alloy handles, non-slip grip, and a spring loaded metal locking catch. The recommended maximum cutting capacity is 20mm diameter. Here is our professional opinion on them from our garden maintenance team…
Clare says:

“Usefulness – Main function
The ratchet pruning shears were very useful when cutting small to medium branches or bamboo stalks and offered very good resistance when cutting through branches, absorbing the force of the cut and making the cut easier on the arms.The ratchet shears were less useful when cutting thinner branches or fleshy perennial plant stems and were too clumsy.The thin stems just got chewed up.
Design
The shears are sturdy and strong and we didn’t encounter any problems with durability. The safety catch on the shears was a so easy to use and well designed.
Target audience
Anyone looking for shears which are ergonomic and which take some of the hard work out of gardening.”
Neil says:

“Initially the ratchet secateurs take a bit of getting used to. Feeling slightly clumpy and not as quick to use as traditional secateurs. After using them for a few hours I got used to them, they definitely come into there own on the thicker, harder to cut, stems and branches. The user can take on branches they wouldn’t even attempt with the traditional secateurs.They definitely have their place in the gardening tool world, for someone with weaker hand/forearm strength looking to lop bigger branches. Call me a romantic but I still prefer the traditional secateurs, they seem faster and less fussy/clumpy.”

Roses photographed by Julie Howden
Sounds like they are worth considering if you are looking to add some new secateurs to your gardening tools.
I’ll leave the last word to Abraham Lincoln who was a very important man (but didn’t know the thorn versus prickles thing so not as clever as me!). He once said:
“We can complain because rose bushes have thorns, or rejoice because thorn bushes have roses.”
Happy gardening!
Lulu x
Oh, and thanks to the lovely Julie Howden Photography for allowing us to share her beautiful rose photos with you. Julie does wedding, family, corporate and many other types of photography. And she’s proper good!
Fairy Gardens Revealed
I love gardens and I love fairies so put the two together and whooosh, it’s like a fairytale ending! In this latest blog I have soooo much to tell you including some AMAZING fairy gardens to go and visit. AND (yes, there’s more!) how to make your very own fairy garden. Come on, let’s go see…

This way for the Fairy Trail…
Alnwick Gardens
I am a very lucky girl as Tilda and I have been to visit two fairy gardens recently. Last week, when we were on holiday, we went to Alnwick Gardens which has a fairytale treasure hunt in it. I have already blogged all about that in A Garden of Fairy Tales so click on the link to go read all about there.

Heading to the Fairy Village in Balfron
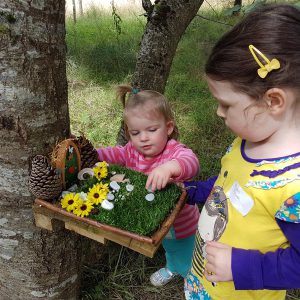
Fairy Woodland Experience
Last month we also visited the Fairy Woodland Experience in Balfron which I want to tell you all about. When you arrive you get a map to guide you around the woodland and there are cute little log with arrows all around the paths to keep you in the right direction. On the day we arrived there was a bit of a panic as the key which opens all the fairy doors had been lost and it was up to us to find it and make sure the fairies could get back in and out of their doors!

Make a wish, press the button and see what happens next…
When we arrived at the Fairy Village we were met by two real life fairies.We were given our fairy names (my name was Rose River and Tilda’s was Glimmer Thistle, cute huh?) and some quiz sheets. On the treasure trail there was a lot to find such as who lived behind the pink door and who lived at number 72. Thankfully we managed to find the missing key (phew) so that solved that crisis. In the village there was loads to see and do – lots of fairy doors to spot, a wishing chair, a worry tree and loads more.
There are fairy doors hidden in LOTS of places
We carried on round the larger woodland walk and found lots more fairy doors and it was a pretty walk through the woodland. We even stopped for a wee picnic on our way.
Back at the hub there was free tea, coffee, juice and biscuits as well as colouring in to do. There’s also a cute shop selling lots of lovely fairy merchandise. My grandma bought Tilda and I fairy doors which we used to make our fairy garden which I will tell you about in a minute.
The worry tree takes all your worries away
We would HUGELY recommend the Fairy Trail. It is only £4 per person (under 2s are free) and we spent hours and hours there. The Fairy Trail is open Thursdays and weekends through September and open through the October school holidays. It will then become the light experience and then the Santa experience before the fairies allow us back to visit again from next March.
There are even more doors to find on the woodland walk
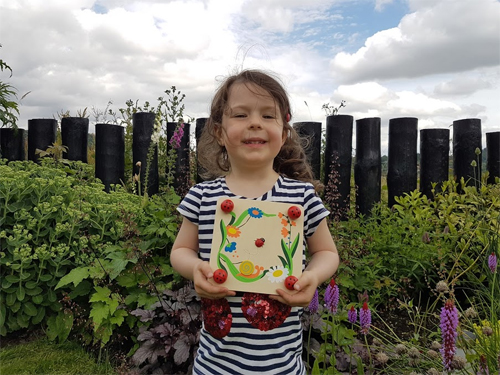
Inspired by our visit to Balfron, Tilda and I decided to make our own fairy gardens. Here is how we made ours:
Make Your Own Fairy Garden
You will need:
- A wooden tray (or an old shoe box)
- Some artificial grass (you can get free samples sent out to you!)
- A fairy door (get one at the fairy experience when you visit)
- Bits & bobs and your imagination to decorate the garden
To make:
1. My clever daddy made me a wooden frame for my garden. You could use a tray or even an old shoe box would work.
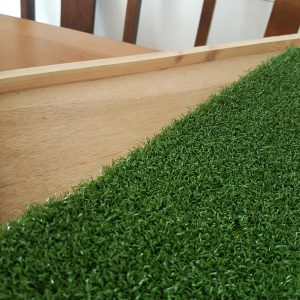
Daddy made me a tray to put some artificial grass into
2. We had some off-cuts of artificial grass which we cut to size. You could ask your grown up to send off for a sample of artificial grass which you could use.
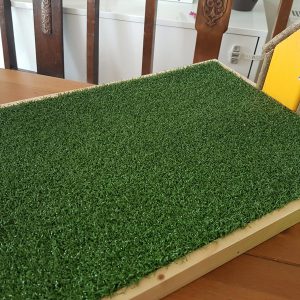
We added our fairy door to one end and then decorated it
3. To decorate our fairy doors we added the stickers which came with them and glued them to our frame.
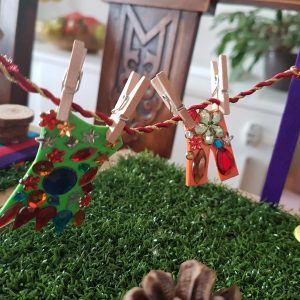
We made some sparkly clothes & a washing line for our fairy
4. We then went wild and designed our garden. Luckily I could get some top tips from M&D who are garden designers. They said we needed to allow a path to the door and somewhere to sit. A hopscotch path was created and we made decks out of lollipop sticks! I made a pond from some mosaics as well as some trees. We found some flowers and used pine cones as shrubs. I also made a wishing seat from a painted stone and made a sign. We even made a washing line and some glittery clothes for my fairy! Tilda made some cool garden furniture using little wood circles and stones. Some toadstools finished off our gardens perfectly.
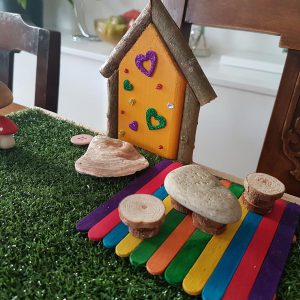
Tilda made a stripey deck and some furniture for her garden
We left buttons outside our fairy doors so fairies know it is empty and they are welcome to come and live there. I hope some come to visit soon!
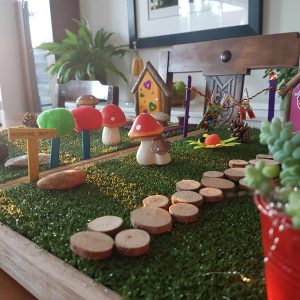
Our completed fairy gardens, waiting for some fairies to move in…
Happy creating!
Rose River (aka Lulu) xx
Perfect Picnics
It may officially be Autumn but the weather (mostly) is still good enough to get outdoors and have a picnic. This blog is as tightly packed as our picnic basket with loads of great stuff including reviews of some innovative picnic products and a cool game you can play for free at your perfect picnic…

Tilda & I LOVE a picnic
Children’s Wood
We headed off to the Children’s Wood (1) in Glasgow at the weekend to meet my BFF Euan for a picnic. If you haven’t already been there it is well worth a visit – it is a magical place, filled with trees, veg beds, mud kitchens, tree houses, swings and all sorts of fun, natural things to play with. The perfect spot for playing and picnics! Two of my favourite things.

We love exploring in the Children’s Wood
Woodland Trust
We were armed with the Woodland Trust’s “Tree Party” picnic pack which is filled with fun ideas for picnics. Our favourite part was doing the Scavenger hunt:
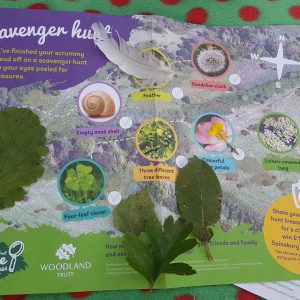
Scavenger hunts are sooooo much fun
It also inspired us to make our very own noughts & crosses game. We found the perfect tree stump as a board, some twigs to make the grid and different coloured stones to use as markers. It was great fun!
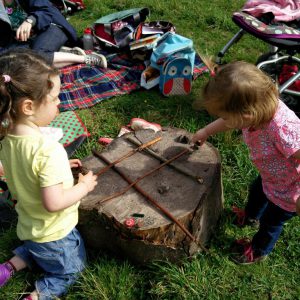
Tilda is pretty good at noughts & crosses!
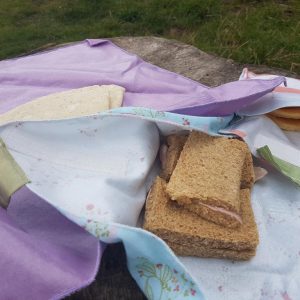
Eco Snack Wrap
All this playing left us really hungry so it was time to raid the picnic and try out some new products which we had been sent. First were some wrappers from eco snack wrap. We had two sizes of sandwich wraps – a smaller size perfect for Tilda and me and a large one perfect for, yup you guessed it, Daddy! We also had a pouch which we popped some pancakes into. They are so much better than using sandwich bags or foil/cling film. Much better for the environment and they look so cute too. They come in a wide range of designs and prices start at £6.25. We definitely recommend them!
The eco wraps are a must-haves for picnics
Sistema Chill it to Go
Daddy also tried out the Sistema Chill it to Go container which is an innovative tub for taking salads on the go. Basically, your salad goes in the main section, there is a neat cool box which fits neatly on the top and has a little hole where a pot for your salad dressing fits perfectly. There is even cutlery hiding in the top! Daddy’s salad stayed perfectly chilled. No excuse for soggy, warm salads any more! The Sistema range is available in a wide range of supermarkets and shops from around £5.49.
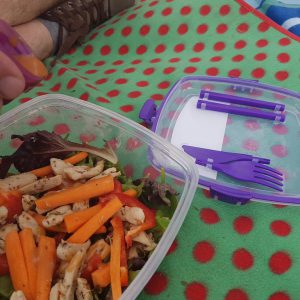
The Chill it to Go containers is perfect for salads on the go
So get out there and make the most of the late summer sunshine and have a perfect picnic.
Lulu xx
(1) Developers are wanting to build houses in this wonderful green space in Glasgow which would be a catastrophic loss to the many people of Glasgow who use the space (and visitors who come there to visit) and get to enjoy and learn about nature in its true setting. Please visit their website to learn more about this great cause and how you can help ensure it is there for future generations.
Prices correct at time of publishing.
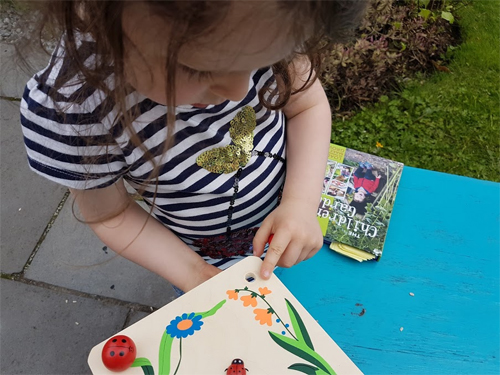
Flower Power
I was recently sent a lovely flower pressing kit by my buddies at BigJigs to review. As an expert flower grower I had plenty of choice of pretty flowers to pick in the garden and see how they looked once they pressed. Read on to see what I thought of the flower press and what you can make from your pressed flowers…

A pressed cirsium looks like a funny moustache!
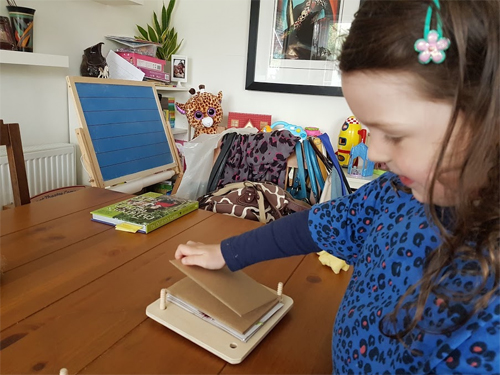
The kit from BigJigs is made of a lovely wood with some pretty flowers and bugs painted on the front of it. It comes with some cardboard pieces inside to help you do your flower pressing, just add some parchment paper in between the cardboard and the flowers.
The BigJigs flower press kit
First you need to cut some flowers. You may need to ask a grown up to help you with bit, partly because they may not want you cutting off their prized roses but also because scissors and secateurs can be dangerous if you are not an expert like me!
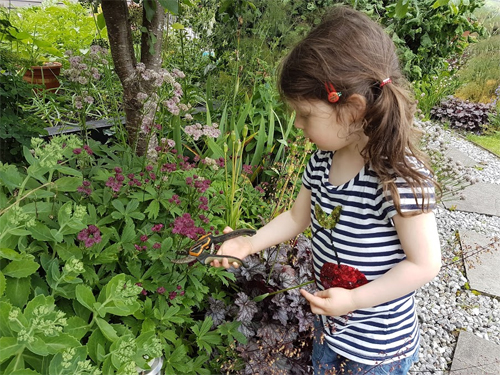
Be careful with those snippy snips!
Once you have chosen a selection of flowers, lay them out on your cardboard pieces ready to be pressed.
Lay your flowers out in your flower press
Next you need to tighten the screws really tightly and leave them to flatten – I left them overnight.
Tighten those screws really really tight!
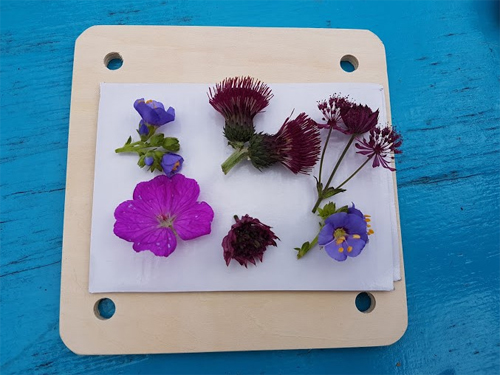
The next morning I had some really pretty, really flat flowers to see!
Opening the kit the next morning was really exciting!
I decided I would like to make them into a bookmark so I chose a piece of card and then glued my flowers on to them.
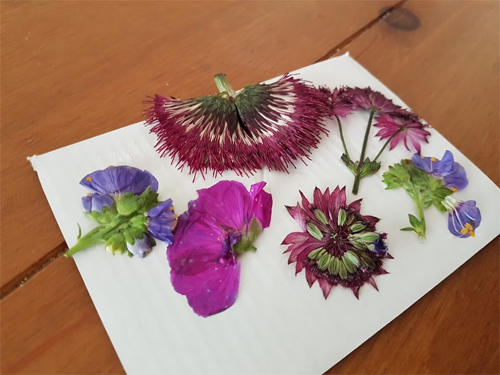
My squished flowers looked really pretty!
Other ideas include making cards, decorate the front of a notebook, make pretty gift tags or just make a lovely picture.
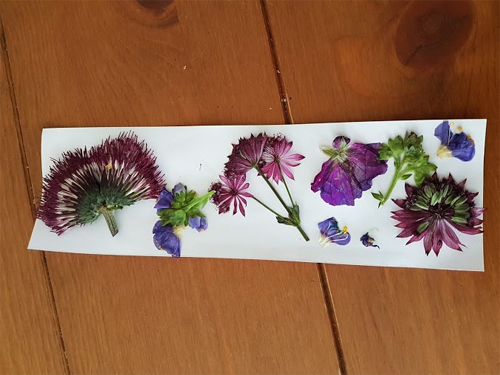
I made a pretty bookmark with my pressed flowers
It was a lovely thing to do during the summer holidays and a great way to preserve your pretty flowers. You can of course just use a large, heavy book to do your flower pressing but the kit is really handy, can be used again and again and is not expensive.
The flower pressing kit is available from BigJigs for £5.49.*
Happy pressing!
Lulu x
*Price correct at time of publication
“The Children’s Garden” – a book review by Lulu Burt
Hey y’all. I am always on the look-out for new ideas for things to do outside in the garden. You may have read my recent blog which had 19 Great Ideas for Summer Fun In The Garden. Well, now I have even more ideas to share with you thanks to a great new book called “The Children’s Garden” by Matthew Appleby.
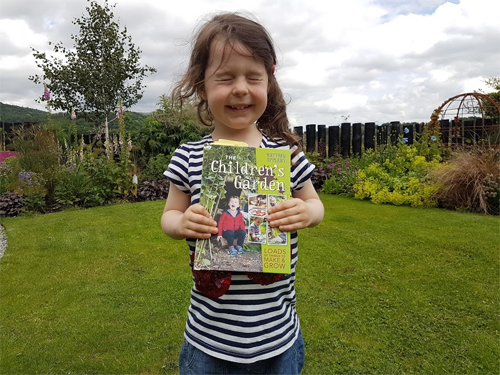
I am so excited about my new book I can’t open my eyes!
There are a whopping 52 projects packed into this book and they are done in a very engaging way. There are LOTS of lovely colour photos as well as plenty of tips and facts within each section. The book is split into the different seasons so that there are always plenty of ideas to choose from whatever time of year it may be. Everything is done on a really low budget and most projects use things which you already have lying about the house. Here are a few of my favourites:
Fun With Potatoes
Potato stamping is an old favourite and perfect for this time of year as we harvest our home grown tatties. There are always a few potatoes which aren’t quite up to my high standards so what better than to use them to do some potato stamping!

Potato stamping made me starry eyed!
Wet Work & Play
There are lots of water fun ideas in this chapter. One that I loved doing was really simple. Mummy gave me a bowl filled with soapy suds and I set about washing all my dolly’s clothes. My clothes ended up drying on the washing line too but it was great fun!
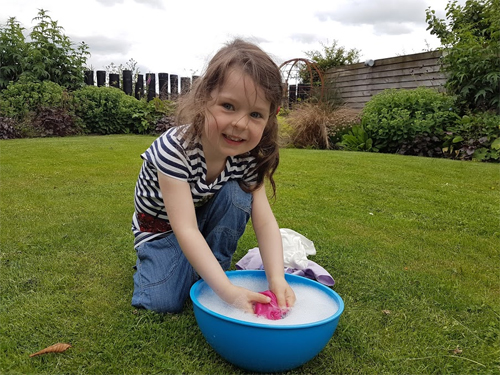
Doing the washing is fun – Mummy says I can always do it!
Flowers To Pick & Press
I have been sent a flower press to try out (I’ll blog all about that soon!) so combining that with this book was the perfect opportunity to try it out. I loved picking lots of pretty flowers then seeing how different they looked once pressed. I then made a pretty bookmark using them.
A pressed cirsium looks like a funny moustache!
Feed The Birds
This was a great project and all we needed was an old water bottle, a couple of pencils and some bird seed. My bird feeder looks great hanging in the garden.

The bird feeder I made out of an old water bottle
And here are some of the ones which I am desperate to try which I haven’t yet…
- Home made seed bombs – kaboom!
- Turf tattoos – hopscotch on the lawn will be fab!
- Butterfly World – M&D have bought me a butterfly cage so that I can do this at home
- Paint it Black – I have some chalk paint and I am going to paint my sand pit lid so that it can double as a chalk board.
- From Picking to Pie – yum, bramble picking, we will be able to do that soon!
- Thinking Ahead – this involves making a time capsule. I am definitely going to do that and get the builder’s to bury it in the foundations of our new house extension!
- Carrot: Root to Cake – I love eating carrots so it will be a struggle to keep some aside for cake making but I’m sure I will manage!
- Make a Cress Head – there are lots of fun ideas of what you can make a cress head from
- Craft a Model Garden – for rainy days when you can’t get outside, this is a perfect way to still enjoy gardening
I thoroughly enjoyed reading “The Children’s Garden” and would definitely recommend it for all children.
I give it a Lulu rating of:

Five out of five, woohoo!
Available on hardback, RRP 14.99 *
Happy reading!
Lulu xx
*Price correct at time of publication
19 Great Ideas for Summer Fun in the Garden
The summer holidays are stretching hazily out far in front of us. There’s no school (nursery) for weeks and weeks. There will be late nights and long lies. Playing with friends. Days out. Picnics. Now, I don’t want to be hearing any murmurs of “Muuuuuuuuum, I’m bored”. The garden is your oyster and I have loads of cool things for you to do outdoors this summer….

Have fun in the garden this summer
Stargaze at night…
With no school to get up for the next morning you have the perfect excuse to stay up late and look at stars on a clear night. You could maybe persuade an adult to camp in the garden with you one night too…
Quoit a lot of fun…
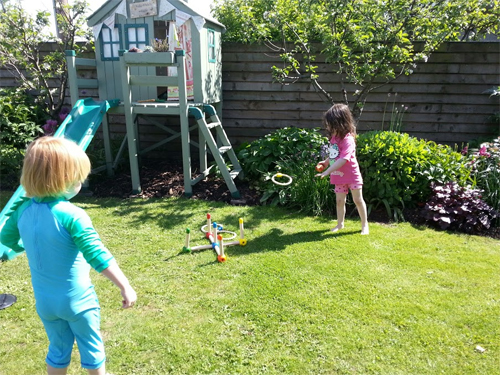
Quoit a lot of fun!
Garden treasure hunt…
This is a great game you can ask a grown up to make so that you and your friends can play at being detectives in the garden. They just need to take photos of some plants and features in the garden and print them on some paper so you can see if you can find them. See if you can remember the plant names too.
Set up your own garden band
Shake, rattle and roll!
Open air theatre
Try some open air theatre… Drag the dressing up box outside and put on a show. Who knows, next summer you could be putting on a Fringe show at the Edinburgh Festival!
Have a Snail Race…
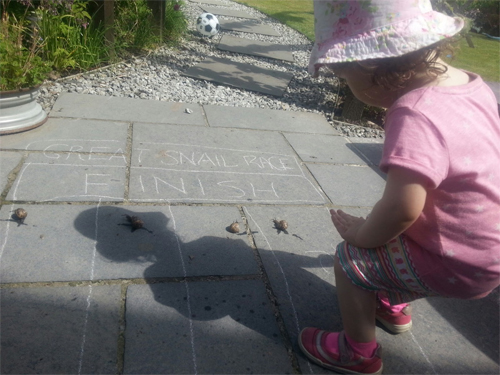
We have plenty of snails which we can race!
Make a miniature garden…
Find some fairy gifts…
Anyone for croquet…
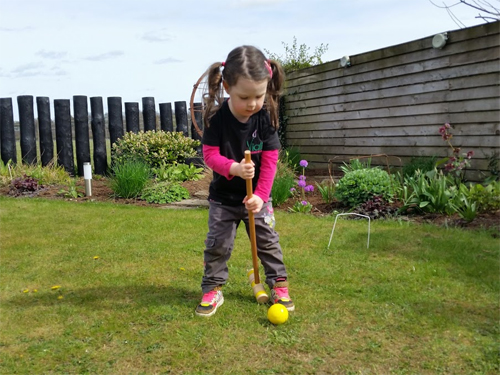
Anyone for croquet?
Make magic potions…
Blow bubbles…
Flower pressing…
Flower pressing is great fun
Make a sand pit…
Play a game of skittles…
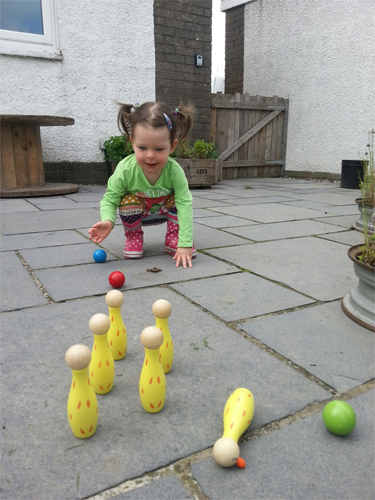
Cute skittles are great fun
Start a garden journal…
Make a garden crown…

Chief Lulu and her magic crown!
We’re going on a bear hunt…
I’m not scared! Well I’m definitely not scared of the cute bears we look for in our bear hunt anyway! Ask a grown up to hide a selection of your toy bears all around the garden so that you and your friends can hunt for them. Watch out for the thick oozy mud!
Make a den
Make a den from a clothes line, pegs and sheet and set up your own camp site. Make sure you set strict rules as to who can enter your den of course!
Crazy about golf
You don’t need to have a lawn like a fairway to enjoy some golf at home. Tilda and I love this crazy golf set for hours of fun in the garden! (£24.99*)
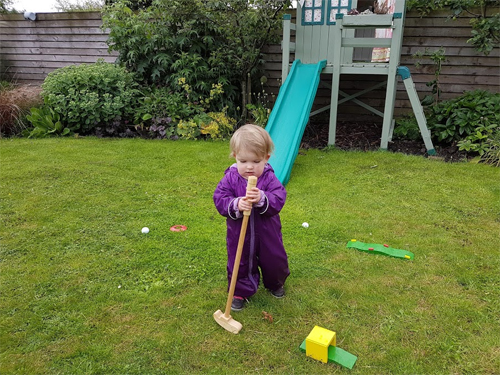
You don’t have to be crazy to play crazy golf. But it helps!
So there’s absolutely no excuse to be bored now these school holidays. Now, get outside and build a den…
Strawberry Fields Forever
I had a lovely weekend playing at farm parks with my friends. I had two favourite parts – one was horse-riding for the first time with my friend Georgia; the other was strawberry picking with my BFF Euan. Here’s a little story about it along with some strawberry facts, an awesome tip from my clever Mummy to make your strawbs’ last longer and a strawberry craft idea for the summer holidays…

I’ve only got eyes for yummy strawberries!
Briarlands Farm
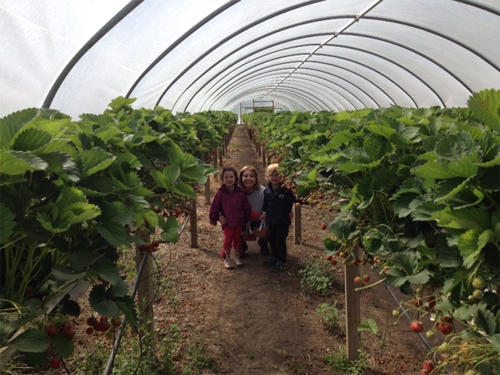
We visited the wonderful Briarlands Farm on Saturday which is one of my favourite places to hang out. There is always plenty to do there from the bouncy pillows to go-karting, petting the animals to going on tractor rides (and we did ALL of that!) At this time of year Briarlands is extra special as you can pick your own strawberries too. So, Euan, Tilda and I went off to the polytunnels to get picking. All of the strawberries at Briarlands are raised up which makes them easy for us to pick. Tilda and I picked a whole punnet each (and may have popped one or two in our mouths along the way, just to make sure they tasted OK, oh and yes they did! But ssshhh, don’t tell anyone!)
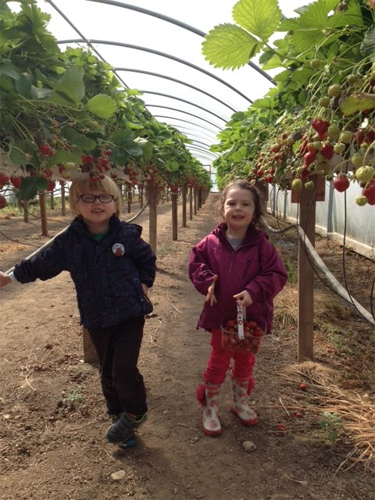
Euan and I had a great time strawberry picking!
Strawberry Facts
So, I thought that seeing as strawberries are in season, that I would share some amazing strawb’ facts with you. Did you know that…
- Strawberries are the only fruit to wear their seeds on the outside?!
- There are 200 seeds on an average strawberry!
- Strawberries are actually a member of the rose family!
- Strawberries are the first fruit to ripen.
- Strawberries have more Vitamin C per serving than an orange.
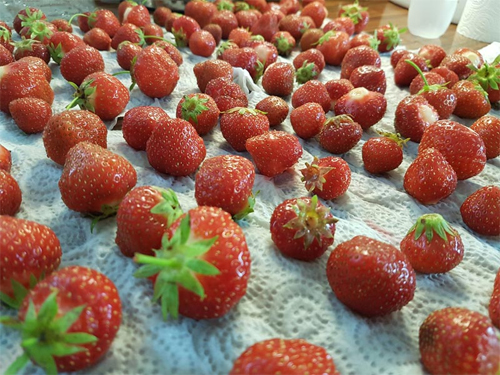
We had lots of punnets full of yummy strawberries to take home!
And one last fact from my super clever mummy. If you are buying LOTS of strawberries like we did at Briarlands, which might take (even strawberry lovers like me and Tilda) a few days to eat, here’s how to make them last longer. Mix 4 cups of water with 1/2 cup of any type of vinegar. Sit the strawberries in the mixture for 2-3 minutes, give them a swirl round then rinse off with some water. Leave them to air dry. Use the vinegar mixture to clean out your punnets so there are no spores left in there. Your strawberries will last longer (if you don’t eat them all first!) and don’t worry, they definitely don’t taste of vinegar.
Make sure your strawberries are left to dry before putting them away
Strawberry craft project
And one way to make your strawberries last forever is with a lovely craft project for the summer holidays. You just need some pebbles and some paint and you can make your very own strawberry patch!
Happy strawberry picking everyone!
Chalkboard Planter: The Perfect Gift for Your Teacher
As school holidays beckon, it’s time to say thank you to our wonderful teachers for all their help and care over the last year. But are you fed up with the same old gifts for teachers? Are you feeling crafty and want something special and personal to give. Well, here is my step by step guide to making a chalkboard planter which combines crafts and plants, my favourite things!

A unique chalkboard planter for my lovely teacher Mrs Sneddon
I am going to show you how to make a chalkboard planter where you can write your own special message…
What you need:
- A terracotta pot
- White paint
- Blackboard paint
- Black marker pen
- Chalk
- A plant
- Compost
How to make it:
1. Paint the top rim of your plant pot white (I gave it a couple of coats)
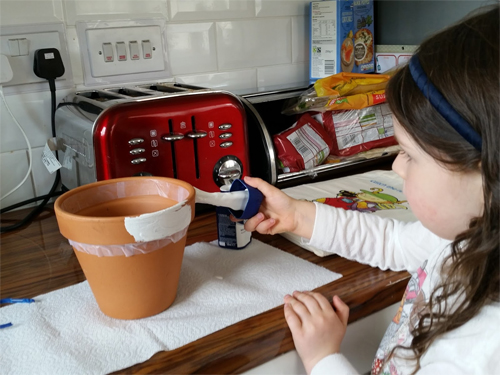
Paint the top ridge of your terracotta pot white
2. Paint the bottom section with blackboard paint (allow 2-3 coats)
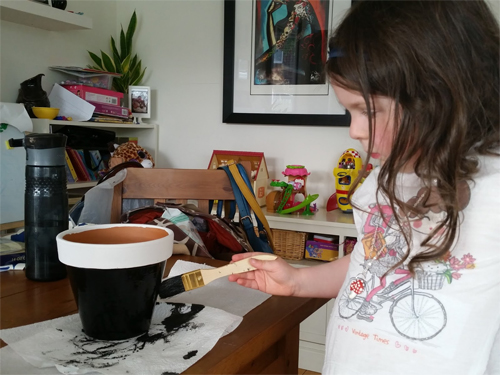
Add your blackboard paint
3. Once dry, draw on your measuring tape around the top using your black marker pen
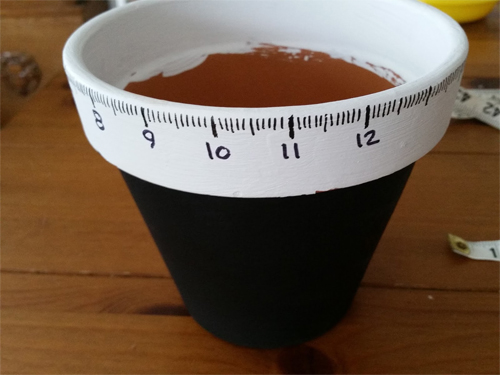
Draw on your measuring tape marks
4. Add your message in chalk. I wrote “Thanks for helping me grow” on one side and “Lulu x” on the other but you could draw/write whatever you want.
5. Plant your plant, being careful not to smudge your artwork.
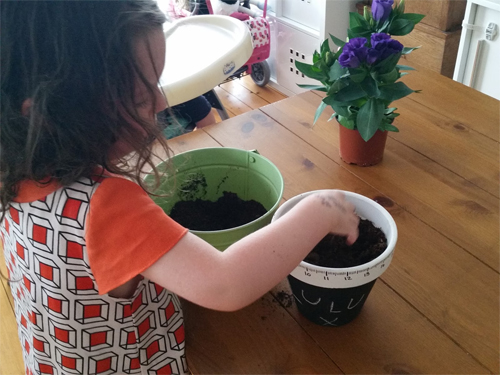
Carefully add compost and your plant
And there you have it, a wonderful, unique gift for your lovely teacher.
A BIG thank you to my clever Auntie Nicola Simm who inspired me to make this gift.
A HUGE thank you to Mrs Sneddon for being my wonderful teacher this year!
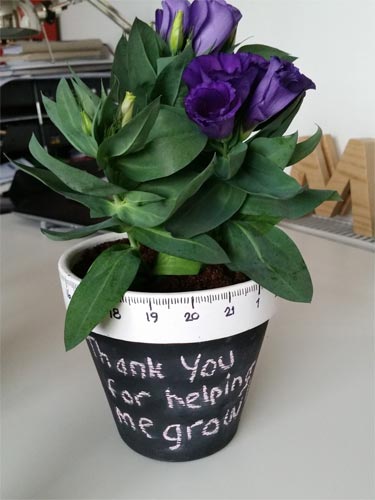
The finished chalkboard planter
Happy crafting!
Lulu xx
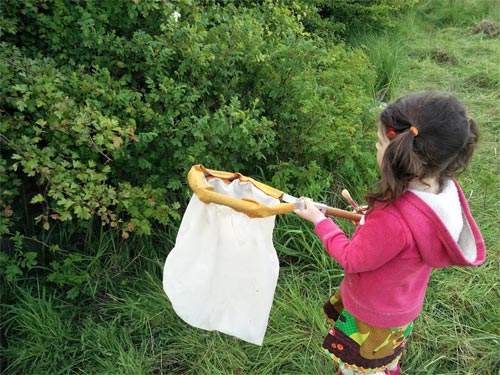
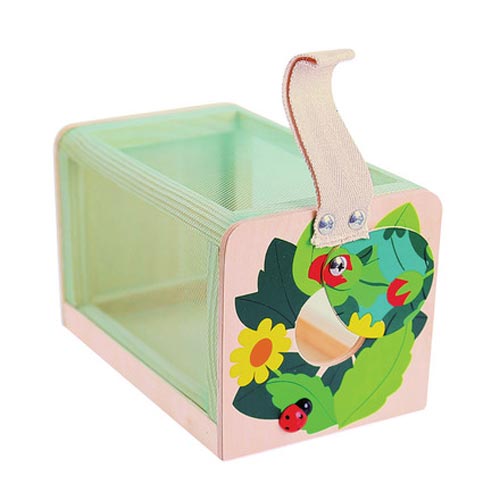
We’re Going On A Bug Hunt
This week is National Insect Week so there is NO better time to get outdoors and go on a bug hunt. Not sure where to start? Well, read on to find out how to go bug hunting and some great kit to use…
A bug hotel, there’s got to be LOTS of bugs living here!
What you need:
- A clear container to pop your bugs into for a closer look
- A net to catch some flying bugs
- A spoon to help dig for bugs and a brush to gently get them into your jar
- A magnifying glass
- A notepad and pen to help keep note of what you have found
My lil sis Tilda loves to go bug hunting too!
Where should you go?:
Bugs can be found pretty much anywhere. Have a look in your own garden and you will find all sorts of things from butterflies to beetles, lacewings to ladybirds, slaters to snails. Head off to your local woods to see if you can find something different lurking deep inside. Or I LOVE to visit Jupiter Urban Wildlife Centre which is great for bug hunting and pond dipping.

A brush can help you gently get a bug into your jar to look at
What to do…
Well, remember to be quiet and gentle when you are bug hunting so you don’t scare any bugs. Also, be careful where you are going so you don’t get stung by any plants or bugs. Under stones and old logs are great hiding places, look under leaves of plants and in their flowerheads and have a dig in some soil.
Look under old logs for bugs
Things to think about…
- What colour is it?
- What size is it? Is it as big as a coin?
- How quickly does it move around?
A magnifying pot is perfect for a closer peak
- What do you think it likes to eat?
- Does it have wings?
- What sort of creature is it?
- And what is its name? I like Leia the Ladybird.
Nets are great for helping catch flying bugs like butterflies
Consider making a home for some of the bugs you find. Bug hotels are great fun to make with lots of materials you will probably have lying about the garden.
You can do a lot of bug hunting using old spoons and containers from your kitchen (remember to ask your parents before you start digging in the soil with their best silverware!)

Remember to takes notes and draw pictures of what you find
My favourite items to go bug hunting with are from Big Jigs Toys:
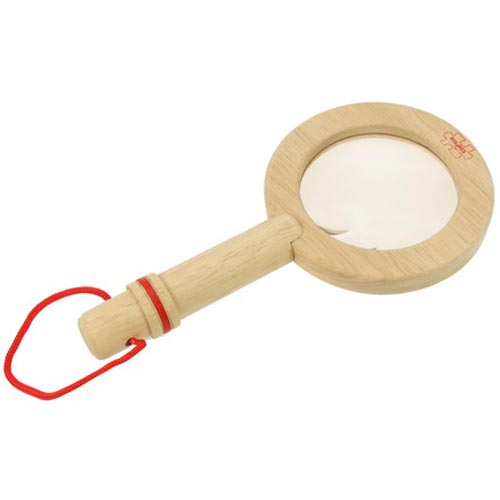
Magnifying Glass, £8.49*, perfect for taking a closer look at all those bugs
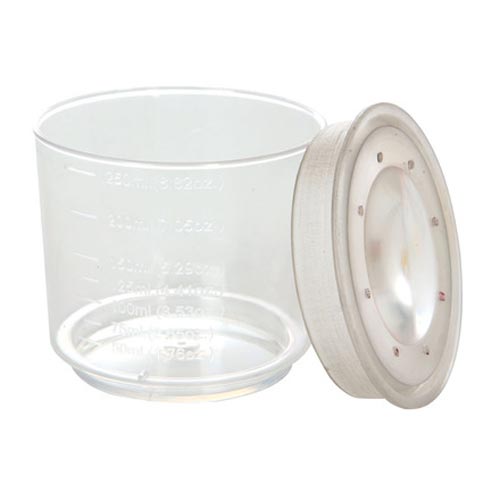
Magnifying Pot*, £3.99, A great way to keep bugs safe while you have a good look
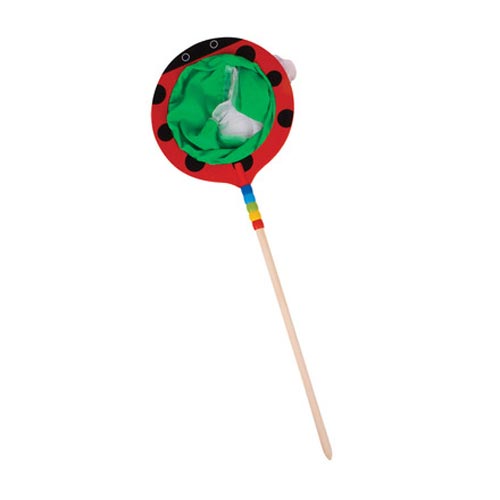
Bug Net*, £7.99, great for catching flying creatures like butterflies
Bug Box*, £5.99, perfect for looking closely at those flying creatures
If you are interested in reading more about bugs then visit our other blogs:
Happy bug hunting everyone!
Lulu xx
*Price correct at time of publication
The Foody: Time to Plant
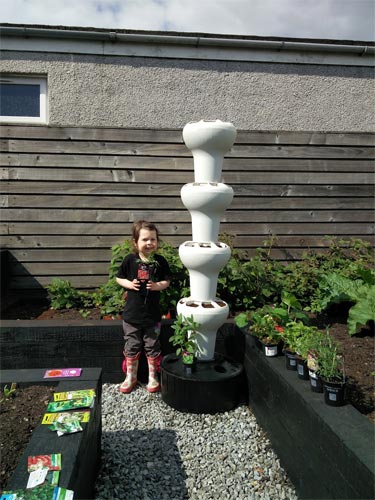
Back in February, we introduced you to the Foody, a revolutionary new way to allow you to plant a wide range of fruit and veg in the tiniest of spaces. In February it was only warm enough to build it and get used to how it worked and make plans for what we would plant in it one sunny day. Well, that sunny day has finally arrived so here is how the Foody looks planted up and what we think of it so far…

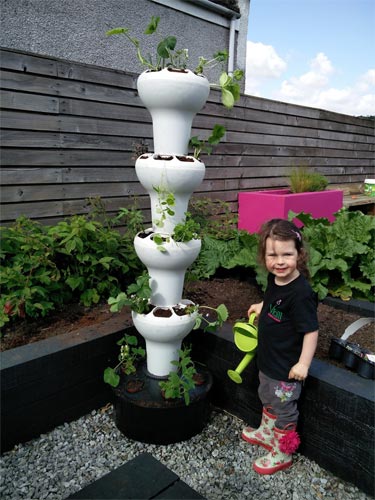
Our Foody, all planted up and looking great!
As we explained in our previous blog, the Foody is a vertical growing system which only needs a fraction of the water and space of traditional growing methods. You can choose different numbers of tiers depending on how tall you want to go. We are trialling the Foody 5, the daddy of the Foody world! So, what did we do?…
Well, we had already built the Foody when it arrived back in February so we were raring to go. We just needed to add our growing medium (compost, coir, whatever you prefer) and decide on what plants/seeds we were going to grow.
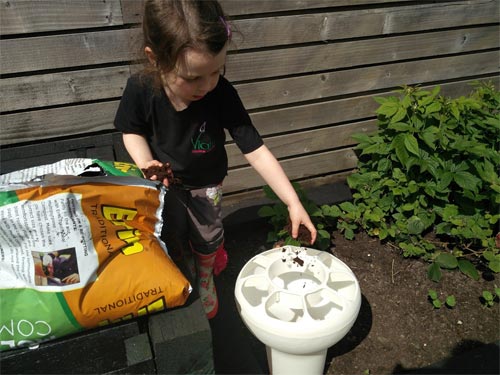
First you need to fill up your Foody with some compost
As we have the Foody 5, we had a whopping 39 spaces to fill! That’s a lot of different types of fruit and veg. We have gone for a yummy selection of things which we love to eat including:
- Bush tomatoes
- Courgettes
- Different types of salad leaves
- Spinach
- Rocket
- Radish
- Spring onions
- Strawberries
- Lots of different kinds of herbs.
We have all of these things growing in traditional methods around the garden too so we can compare how well the Foody works to them.
We needed lots of plants and seeds to fill our Foody!
The Foody looks really stylish and makes a real statement in the garden. It is also well made and looks like it will last well. It was great fun planting up the Foody as it’s such an unusual way to garden. To be able to fit all of this fruit and veg into such a tiny corner of our garden is amazing and we think it would be a wonderful solution for those with little space or who want to try “grow your own” without giving up too much garden space. The whole Foody spins easily so you can turn it around and make sure all areas get good sunlight as well as making it easy to water.
Gently plant your fruit and veg into the different pods (or
you could plant flowers to make an amazing floral sculpture!)
We are also very interested to see if it means our courgettes can escape being ravaged by slugs and snails or if they will make the journey up high! As our garden is a little windy and as we have the super-tall Foody 5, Daddy has had to build a collar for the Foody so that it doesn’t fall over in the wind. It would be good if the taller Foodies came with something to help stabilise them. Or if you live in a windy area then just choose one of the two shorter Foodies which will solve this issue.
Once planted, water your Foody. The clever reservoir
in the bottom holds the water so you use much less water.
We will keep you posted as the season goes on but we are certainly loving our Foody adventure so far. For more information on the Foody visit LIFE.
Lulu x
Grass-ias
We all want the perfect lawn in our gardens. A lovely, flat, weed-free, green space for playing and lounging on. But it isn’t very easy to achieve with all the weeds flying about and our wet weather and heavy soils. But, to help you get closer to that dream, I have collated my top tips for a lovely lawn this summer..

Lulu loves lounging on a lovely lawn!
Scarify your lawn
You can add a moss killer to your lawn but you don’t need to. Just use your muscles and a good garden rake to get the moss out of your lawn. I used my Twigz rake which was perfect for the job (£8.99*)
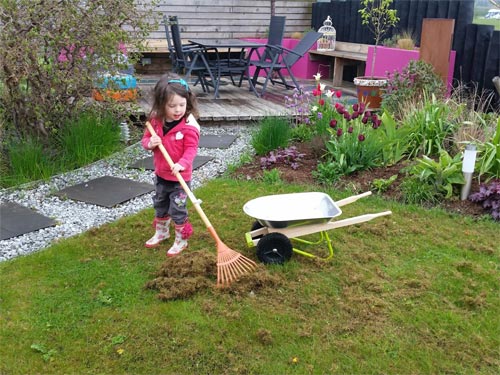
You need good muscles to rake up your moss
You can put the moss into your compost bin. My Twigz wheelbarrow is incredibly sturdy and perfect for this job (£49.99*)
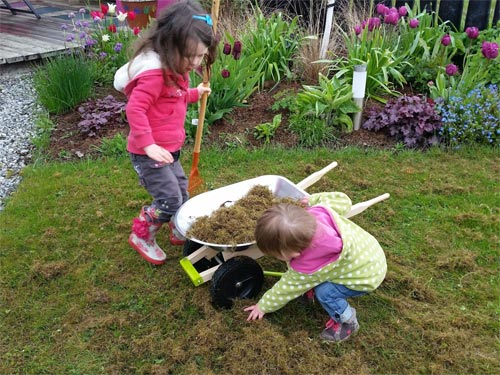
Collect your moss and put it on your compost bin
Weed Your Lawn
Lawn weeds can be a real pain. You can buy weedkiller to put on the lawn or you can use old fashioned muscle and dig up the offenders! Regular weeding is key so they don’t take over and leave no space for the grass to grow.
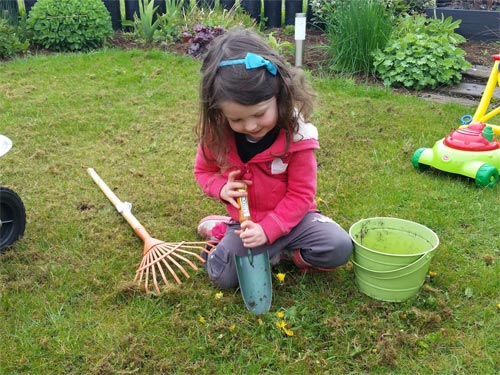
Tackle those weeds using a trowel and some muscles
Aerate your soil
If you have a heavy soil and a compacted lawn it makes it hard for the grass to grow well and thatch starts to build up. You can buy special tools to aerate your lawn or you can just use a garden fork to create the holes.
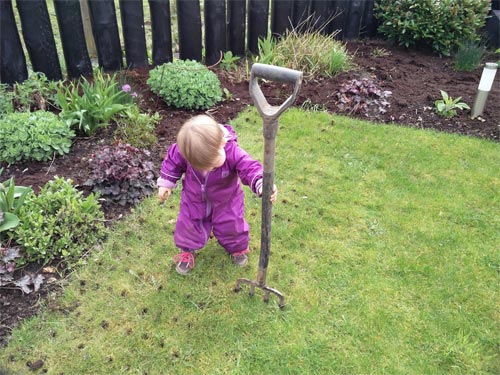
Tilda is an expert at aerating lawns!
Add a top dressing
You can add sand if you have clay soil or just a lawn improver to your lawn which will go into the holes you have made and improve the soil making the grass grow better. Use a brush like the Twigz garden broom (£8.99*) to spread the lawn improver around. You can add some grass seed to bare areas while you do this and some fertiliser too to give your grass a wee helping hand.
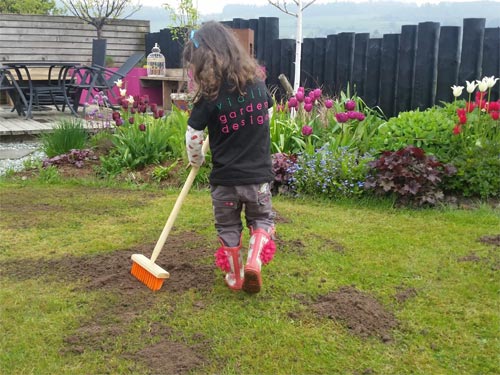
Brush your top dressing into the holes
Cut your grass
It’s always tempting to cut your grass very short to make it nice and neat but it’s not good for your lawn. Raise the level of your lawnmower and just give it a gentle trim or it will look bare and weeds will thrive instead of the grass. Little and often is the secret. How cute is this Flying Bee Lawnmower from Bigjigs? I love using it on my lawn and Tilda loves the bee which flies off into the air. (£32.99*)
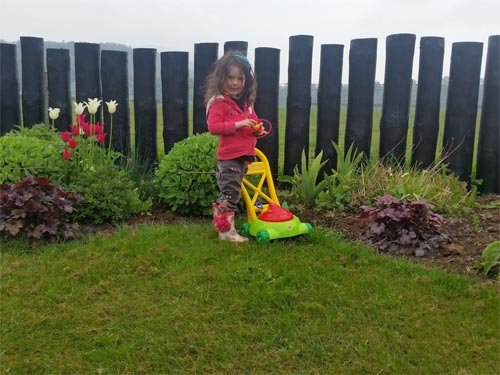
Don’t set your lawn mower too low when you cut your grass
Grass-ias! If all that seems like a bit too much hard work and you would rather just lie back and enjoy your garden while others did the work for you then contact us to arrange a quote for us to do your lawn treatments and grass cutting for you!
Lulu xx
*Prices correct at time of publication